MailDepot Install/Setup
Installation and setup of MailDepot are described below.
Pre-Installation Requirements
The following setup is required before installing MailDepot.
SELinux setup
To use MailDepot, SELinux must be disabled. To diable SELinux, change the SELINUX variable in the /etc/sysconfig/selinux file as follows and restart operating system.
SELINUX=disabled
Firewall settings
You must allow the acccess of following TCP ports used by MailDepot.
- Accessing server from outside:
SMTP (25), HTTP (80)
- Accessing outside from server:
SMTP (25), POP3 (110)
If you are using firewalld service, please configure firewalld as following.
# firewall-cmd --add-service=http --add-service=https --add-service=smtp
# firewall-cmd --runtime-to-permanent
# firewall-cmd --list-service
Required Packages
You need to install required packages as following before installing MailDepot.
MailDepot installer will install required packages if not installed.
- RHEL7 / CentOS 7
-
# yum install -y ed sed tar initscripts perl apr apr-util \
  pkgconfig freetype libxml2 openssl ipa-gothic-fonts vlgothic-fonts
- RHEL8 / AlmaLinux 8 / Rocky Linux 8
-
# dnf install -y ed sed tar initscripts perl apr apr-util \
  pkg-config freetype libxml2 openssl google-noto-sans-cjk-ttc-fonts
- RHEL9 / AlmaLinux 9 / Rocky Linux 9
-
# dnf install -y sed tar initscripts ed perl apr apr-util \
  pkg-config freetype libxml2 openssl google-noto-sans-cjk-ttc-fonts
Further, you should uninstall the PostgreSQL and Httpd packages as following because MailDepot will install its own PostgreSQL and Httpd packages.
# yum remove postgresql httpd
Service startup settings
MailDepot requires the following services must be started.
syslog, cron
Mount SSD-based I/O Accelerator (Optional)
If /fio directory exits on installation, MailDepot installer asumes that SSD-based I/O Accelerator is mounted on /fio directory, and ask you to use SSD-based I/O Accelerator for MailDepot. If you want to use SSD-based I/O Accelerator for MailDepot, you should mount SSD-based I/O Accelerator on /fio directory in advance.
If you decide to use SSD-based I/O Accelerator for MailDepot, MailDepot installer will create pg_xlog and data directory on /fio directory. If these directories exits on /fio directory, you have to remove or rename it in advance.
Installation Guide
Mount Installation Media
To install MailDepot, mount the Installation CD into the server, and follow the procedure given below in the directory where the Installation CD is mounted.
You must mount the Installation CD without noexec option.
If the Installation CD is mounted automatically by the auto-mount feature in Red Hat Linux, the Installation CD is mounted with noexec option. In such case, you must unmount the Installation CD and remount manually using the mount command.
If Installation CD is mounted with noexec option, the installation script will display following error messages, and the installation procedure may be failed.
Enter license key (XXXX-XXXX-XXXX-XXXX): ABCD-EFGH-IJKL-MNOP
install.sh: line 98: ./packages/rhel5-i386/md_keychk: Permission denied
License key is invalid.
When you see the above error message, unmount the Installation CD and remount using the mount command and execute the installation script again.
Invoke Installation Script
-
Invoke the script "install.sh" as root user.
# sh install.sh
-
Confirm the contents of the software license agreement.
Press enter key and scroll the screen to confirm the contents of the license agreement. The software license agreement is described in Japanese, so if following erro messages is displayed or your terminal cannot display Japanese characters correctly, refer "LICENSE.txt" in Installation CD with your favorite text viewer.
Cannot display the license terms in Japanese.
Read the "LICENSE.txt" file.
-
If you agree the contents of the license agreement, enter "yes" otherwise enter "no".
Do you agree the license terms (yes/no): yes
If you enter "yes", then the installation will be started. If you enter "no", it will be stopped.
-
Enter user name and company name.
Enter user name: Taro Yamada
Enter company name: Example, Inc.
-
Enter the license key.
Enter license key (XXXX-XXXX-XXXX-XXXX): ABCD-EFGH-IJKL-MNOP
license key accepted.
If the license key is invalid, the following message is displayed and the installation will be stopped.
License key is invalid.
-
Enter the user name for super-user of MailDepot.
If the user name is empty, "maildepot" will be used as super-user.
Enter super-user name for mailDepot [maildepot]:
If the account of super-user does not exist in operating system, display the following messages and create new account for super-user.
User "maildepot" does not exist.
Creating user "maildepot"... succeeded.
If the account of super-user exists in operating system, then the following message is displayed.
User "maildepot" already exists.
All processes such as mail archiving and database server will be executed by this super-user.
-
Specify the size of memory used for MailDepot.
If you don't specify the size, MailDepot installer use all physical memory for MailDepot. if your server is used only for MailDepot, you don't need to specify it.
Enter memory size (GB) utilized for MailDepot [16]:
MailDepot is configured for large memory.
MailDepot installer updates the configuration parameters related to memory usage
-
Ask to use SSD-based I/O Accelerator for MailDepot if /fio directory exits. If you enter "yes", SSD-based I/O Accelerator is used for MailDepot. If you enter "no", SSD-based I/O Accelerator is not used for MailDepot.
Do you setup fast disk (yes/no): yes

Creating transaction log directory on fast disk... Succeeded.
If you enter "yes", transaction logs and index information of current monthly archived data are created on SSD-based I/O Accelerator, and maildepot.conf configuration file is updated automatically.
If you want to use SSD-based I/O Accelerator for MailDepot, you should mount SSD-based I/O Accelerator on /fio directory in advance.
-
Install Packages.
All required packages are installed automatically.
Installing packages...
   1:maildepot3-libarchive  ########################################### [  9%]
   2:maildepot3-libtextconv ########################################### [ 18%]
   3:maildepot3-mecab       ########################################### [ 27%]
   4:maildepot3-postgresql  ########################################### [ 36%]
   5:maildepot3-php         ########################################### [ 45%]
   6:maildepot3-libsylph    ########################################### [ 55%]
   7:maildepot3-httpd       ########################################### [ 64%]
   8:maildepot3-mdadmin     ########################################### [ 73%]
   9:maildepot3-mdimport    ########################################### [ 82%]
  10:maildepot3-mecab-ipadic########################################### [ 91%]
  11:maildepot3-p7zip       ########################################### [100%]
-
Setup the Database Server.
All archived mail messages will be stored in this database.
Setting up PostgreSQL database server
-
Specify the database cluster directory (Directory which stores the Database contents).
If you do not specify the directory, /opt/maildepot3/data is used as default directory.
Enter path to database cluster directory [/opt/maildepot3/data]:
If the specified directory is not empty, the following message is displayed and ask whether you will delete the directory. If you enter "yes", the directory will be deleted. If you enter "no", the directory is not deleted.
Directory "/opt/maildepot3/data" already exists but is not empty.
Do you delete directory "/opt/maildepot3/data" (yes/no): yes
If you have entered no, you have to specify another directory.
-
Enter the port number of the database server to accept the connection.
If you do not specify a port number, 5432 is used as default value.
Enter port number for database server [5432]:
-
A database cluster is created and the specified port number is assigned in the configuration file.
Creating database cluster... succeeded.
Changing configuration file... succeeded.
-
-
Setup the http server.
Administration Console of MailDepot use this http server.
Setting up Apache web server
-
Specify the port number of the http server to accept the connection.
If you do not specify a port number, 80 is used as default value.
Enter port number for web server [80]:
-
The specifed port number is assigned in the configuration file.
Changing configuration file... succeeded.
-
-
Configure MailDepot.
Setting up MailDepot
-
Enter the sender email addresss for notification emails.
If the sender email address is empty, "maildepot@HOSTNAME" will be used as sender email address.
Enter sender email address for notifications [maildepot@HOSTNAME]:
MailDepot will send notification emails using this email address as the sender.
-
All required confiration files for MailDepot are created automatically.
Changing file access permission and owner... succeeded.
Creating configuration file... succeeded.
Creating license file... succeeded.
Creating authenticity file... succeeded.
-
-
Configure Syslog (rsyslog).
Configuring logging to Syslog... Succeeded.
-
Start services.
Services are started automatically.
Starting services... succeeded.
-
If you decide to use SSD-based I/O Accelerator for MailDepot, MailDepot installer will create the space for index information of current monthly archived data.
Creating tablespace on fast disk... Succeeded.
-
Enter the initial domain name.
If the domain name is empty, "default" is used as default value.
Enter domain name for MailDepot [default]:

Creating domain... Succeeded.
You can add another domain to support multiple tenants. See Multi-Domain Option License for more.
-
Create users for Administration Console.
Creating user for administration Console

Enter name of new user : yamada
Enter mail address for new user: yamada@example.com
Enter password for new user:
Enter it again:
The user specified here can log in into Administration Console.
To add users for Administration Console, operate at User Management screen in Administration Console, or execute the md_useradd command.
-
Complete the installation of MailDepot.
Installation completed successfully.
Startup Setup Guide
Here, we describe the procedures to start archiving mails.
Login into Administration Console with your Web Browser.
Enter the following URL in your web browser. If the port number is changed from default value, then add [:port-number] after the hostname of maildepot server.
http://maildepot-server/domain-name/
Login using the username and password.
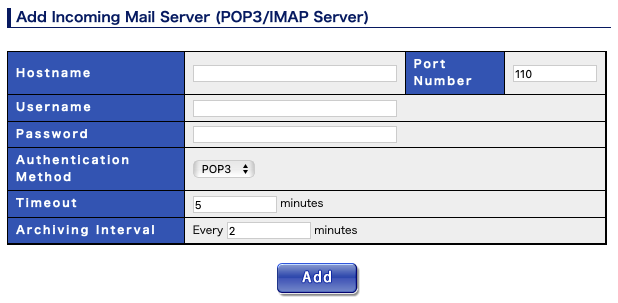
Setup your Mail Server.
Setup your mail server so that all the sent/received mail messages are copied to a specific account on your POP3 server. For mail server setup details, please refer to "Mail Server Setup Manual".
Add the POP3 server at Mail Server Setup screen in Administration Console.
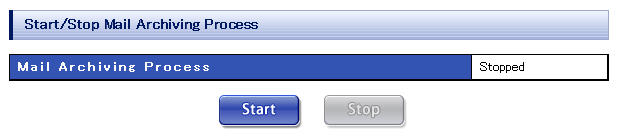
Start archiving process at Start/Stop Mail Archiving screen in Administration Console.
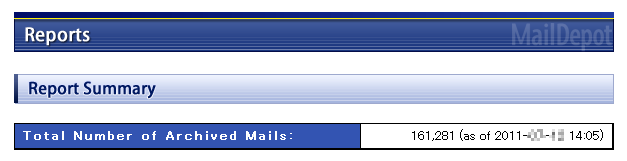
Check that mail messages are started to be archived.
If the mail archiving process has started up normally, the following messages will be output into /var/log/maildepot via syslog service. These messages show the starting and completion of the initialization of all backend processes
Mar 27 05:59:49 maildepot-server md_watch[791]: INFO: Process started
Mar 27 05:59:50 maildepot-server md_watch[793]: INFO: Process started
Mar 27 05:59:50 maildepot-server md_watch[795]: INFO: Process started
Mar 27 05:59:50 maildepot-server md_watch[796]: INFO: Process initialized
Mar 27 05:59:50 maildepot-server md_alert[797]: INFO: Process started
Mar 27 05:59:50 maildepot-server md_alert[798]: INFO: Process initialized
Mar 27 05:59:51 maildepot-server md_job[800]: INFO: Process started
Mar 27 05:59:51 maildepot-server md_job[801]: INFO: Process initialized
Mar 27 05:59:52 maildepot-server md_watch[803]: INFO: Process started
Mar 27 05:59:53 maildepot-server md_import[804]: INFO: Process started
Mar 27 05:59:53 maildepot-server md_import[805]: INFO: Process initialized
If mail messages are being archived successfully, following messages will be output into syslog. These messages show the start and completion of Mail archiving.
Mar 27 06:04:52 maildepot-server md_import[805]: INFO: Import of messages on maildepot@localhost:110 started
Mar 27 06:04:52 maildepot-server md_import[805]: INFO: Import of messages on maildepot@localhost:110 completed: 1 imported
Mail archiving will be done by the Mail Archiving Process at interval specified by "Mail archiving interval" setting (5 minutes is default). Therefore, the syslog message that Mails have been archived will be output after the largest interval has elapsed after starting up the Mail Archiving Process. The "1 imported" message shows the number of archived Mails.
Further, the number of archived mails can be checked at Report Summary screen in Administration Console.
Setup of Envelope Header
The stup of Envelope Header is required to search archived mail messages with envelope address. Further, the stup of Envelope Header is required to use Personal Search Option. If the setup of Envelope Header is not correct, you cannot use Personal Search function.
Envelope Address
MailDepot retrieves envelope address (sender and recipients in mail delivery protocol) from mail header. However the standard mail headers do not include envelope address, some mail servers or mail filtering products provide envelope address as optional headers for jornal mail. Further, it is possible to provide envelope address as optional headers by installing milter program for the mail server that support Milter API as sendmail and postfix.
If your mail server provides envelope address (sender and recipients) as optional headers, You have to set these header as Envelope Header for sender/recipients.
Example of Envelope Header:
From: hoge@example.com
To: foo@example.com
Cc: bar@example.com
X-Envelope-From: hoge@example.com                                 <- Added
X-Envelope-To: foo@example.com, bar@example.com, baz@example.com  <- Added
Envelope Header can be multiple-lines. Also, Envelope Header
can be placed at any line in mail header.
X-Envelope-From: hoge@example.com
X-Envelope-To: foo@example.com
X-Envelope-To: bar@example.com
X-Envelope-To: baz@example.com
Your mail servers may not provide envelope address in mail header. In this case, you have to use starndard mail header as Envelope Header.
Setting Envelope Header
The envelope header for sender address and the envelope header for recipient address are set in following configuration file.
/opt/maildepot3/domain/domain-name/etc/maildepot.conf
The stup of Envelope Header should be done before starting archive.
These values are set as initial value for Envelope Header.
header_envelope_from = "X-Envelope-From:"
header_envelope_to = "X-Envelope-To:"
You can specify multiple headers separated with camma.
header_envelope_from = "From:"
header_envelope_to = "To:,Cc:"
In above example, the standard header is used as Envelope Header. In this case, you cannot search archived mail messages with Bcc.
See Confiuration Files for more about setting maildepot.conf.
Setting for md_milter
If you use md_milter, no need to change default setting for Evelope Header.
header_envelope_from = "X-Envelope-From:"
header_envelope_to = "X-Envelope-To:"
This setting enables Bcc search functionality in MailDepot.
Setting for Microsoft Exchange
For Microsoft Exchange server or Exchange Online, no need to change default setting for Evelope Header. MailDepot use envelope information stored in MS Jounal Report Mail.
Bcc search functionality is always enabled for MS Jounal Report Mail in MailDepot.
Setting for Gmail (Google Workspace)
When archiving Gmail, please set "Add X-Gm-Original-To header" in the recipient settings of the archive destination.
To set up forwarding in Gmail, you need to open the Receiving Routing Options and Sending Routing Options screens from the Google admin console. You need to select "Modify message" and then select "Add recipient". At this point, you need to select "Add X-Gm-Original-To header" from the detailed settings of the forwarding destination.
The following setting enables Bcc search functionality in MailDepot.
header_envelope_from = "From:"
header_envelope_to = "X-Gm-Original-To:"
Setting for Notes/Domino
Notes/Domino does not provide envelope information in journal mail. For this reason, MailDepot needs to use the standard header as Envelope Header.
header_envelope_from = "From:"
header_envelope_to = "To:,Cc:"
For this setting, you cannot search archived mail messages for Notes/Domino with Bcc.
Setup of Stunnel
MailDepot does not supoort SSL or TLS connections for the SMTP and POP3/IMAP protocols. Therefore, if the POP server requires SSL connections, or if the SMTP server requires SSL connections, MailDepot uses stunnel to establish SSL connections.
Stunnel for RHEL7 / CentOS 7 / RHEL8 / Alma Linux 8 / Rocky Linux 8
On RHEL7 / CentOS 7 / RHEL8 / Alma Linux 8 / Rocky Linux 8, you need to install following rpms package to use stunnel.
- stunnel
- xinetd
You can install rpm packages by using yum command.
# yum install stunnel xinetd
After install rpm packages, you need to enable xinetd service.
# systemctl enable xinetd
# systemctl start xinetd
Stunnel for POP protocol
To use ssl connection for POP3 protocol, you need to create configuration file for xinetd named /etc/xinetd.d/pop3.
service 8110
{
    type            = UNLISTED
    socket_type     = stream
    port            = 8110
    wait            = no
    user            = root
    server          = /usr/bin/stunnel
    server_args     = /etc/stunnel/pop3.conf
    only_from       = 127.0.0.1
    disable         = no
}
Then you need to create the configuration file for stunnel named /etc/stunnel/pop3.conf.
client = yes
connect = POP3_HOST:995
After creating configation files, you need to restart xinetd service.
# systemctl restart xinetd
After above setup procedure finished, connecting to local port 8110 will establish an SSL connection to the POP server specified in /etc/stunnel/pop3.conf.
# telnet localhost 8110
You can set the following hostname and port number for incoming mail server on MailDepot Administation Console.
| Hostname | localhost |
|---|---|
| Port Number | 8110 |
Stunnel for SMTP protocol
To use ssl connection for SMTP protocol, you need to create configuration file located at /etc/xinetd.d/smtp for xinetd.
service 8025
{
    type            = UNLISTED
    socket_type     = stream
    port            = 8025
    wait            = no
    user            = root
    server          = /usr/bin/stunnel
    server_args     = /etc/stunnel/smtp.conf
    only_from       = 127.0.0.1
    disable         = no
}
Then you need to create the configuration file for stunnel named /etc/stunnel/smtp.conf.
client = yes
connect = SMTP_HOST:465
After creating configation files, you need to restart xinetd service.
# systemctl restart xinetd
After above setup procedure finished, connecting to local port 8025 will establish an SSL connection to the SMTP server specified in /etc/stunnel/smtp.conf.
# telnet localhost 8025
You can set the following hostname and port number for outgoing mail server on MailDepot Administation Console.
| Hostname | localhost |
|---|---|
| Port Number | 8110 |
Stunnel for RHEL 9 / AlmaLinux 9 / Rocky Linux 9
On RHEL9 / AlmaLinix 9 / Rocky Linux 9, you need to install following rpm packages to use stunnel.
- stunnel
You can install rpm packages by using dnf command.
# dnf install stunnel
After install rpm packages, you need to create configuration file for stunned named /etc/stunnel/stunnel.conf.
Stunnel for POP protocol
To use ssl connection for POP3 protocol, you need to add following settings into the configation file named /etc/stunnel/stunnel.conf.
[pop3]
client = yes
accept = 127.0.0.1:8110
connect = POP_HOST:995
After create configration file for stunnel, you need to enable stunnel service.
# systemctl enable stunnel
# systemctl start stunnel
After you modify configation file for stunnel, you need to restart stunnel service.
# systemctl restart stunnel
After above setup procedure finished, connecting to local port 8110 will establish an SSL connection to the POP server specified in /etc/stunnel/stunnel.conf.
# telnet localhost 8110
You can set the following hostname and port number for outgoing mail server on MailDepot Administation Console.
| Hostname | localhost |
|---|---|
| Port Number | 8110 |
Stunnel for SMTP protocol
To use ssl connection for SMTP protocol, you need to add following settings into the configation file named /etc/stunnel/stunnel.conf.
[smtp]
client = yes
accept = 127.0.0.1:8025
connect = SMTP_HOST:465
After create configration file for stunnel, you need to enable stunnel service.
# systemctl enable stunnel
# systemctl start stunnel
After you modify configation file for stunnel, you need to restart stunnel service.
# systemctl restart stunnel
After above setup procedure finished, connecting to local port 8025 will establish an SSL connection to the SMTP server specified in /etc/stunnel/stunnel.conf.
# telnet localhost 8025
You can set the following hostname and port number for outgoing mail server on MailDepot Administation Console.
| Hostname | localhost |
|---|---|
| Port Number | 8025 |
Starting/Stopping MailDepot
Backend processes, database server and http server of MailDepot are registered as system services and will be started automatically when the OS starts. To manually start or stop these service, You should execute "systemctl" command as root user. Mail archiving process can also be started/stoped at Start/Stop Mail Archiving screen in Administration Console.
- Startup of MailDepot:
-
# systemctl start maildepot3
Starting postgresql:                                       [  OK  ]
Starting maildepot [default]:                              [  OK  ]
- Startup of Administration Console:
-
# systemctl start maildepot3-httpd
Starting httpd                                             [  OK  ]
- Stopping MailDepot:
-
# systemctl maildepot3 stop
Stopping maildepot [default]:                              [  OK  ]
Stopping postgresql:                                       [  OK  ]
- Stopping Administration Console:
-
# systemctl stop maildepot3-httpd
Stopping httpd:                                            [  OK  ]
Starting/Stoping Service on Multi-Domain Environment
With Multi-Domain option, MailDepot manages multiple tenants (sites) in single server.
You can control archiving process at Start/Stop Mail Archiving in Administration Console for each domain. And more, you can inactivate some domain with md_domain command.
Check Version Number
The version number of MailDepot is displayed at the right side of MailDepot logo on the header part in Administration Console.

You can check the version number of MailDepot with following command. maildepot3-mdimport is package for backend programs, and maildepot3-mdadmin is package for Administration Console. In REHL8, maildepot3-httpd version is 2.4.x.
# rpm -qa | grep maildepot3
maildepot3-libsylph-1.1.0-4.x86_64
maildepot3-mdimport-3.4.0-1.x86_64
maildepot3-mecab-0.996-1.x86_64
maildepot3-php-5.4.45-2.x86_64
maildepot3-mecab-ipadic-2.7.0.20070801-1.x86_64
maildepot3-httpd-2.2.34-1.x86_64
maildepot3-libtextconv-3.0.9-1.x86_64
maildepot3-mdadmin-3.4.0-1.noarch
maildepot3-postgresql-9.2.24-1.x86_64
maildepot3-p7zip-16.02-1.x86_64
maildepot3-libarchive-3.3.3-2.x86_64
maildepot3-milter-1.04-1.x86_64
Upgrading MailDepot
To upgrade MailDepot, you need to download MailDepot Installation file from the MailDepot support site.
If you want to upgrade from MailDepot version 1.x or 2.xto MailDepot version 3.x, you must install MailDepot version 3.x on another new machine. Then migrate archived mail data saved in MailDepot version 1.x or 2.x to MailDepot version 3.x as described in Migration from older version.
You need to mount the Installation file (ISO file) on the server and change current directory to mounted directory. After that, please follow the procedure given below to upgrade MailDepot.
-
Invoke the upgrade script "upgrade.sh" as root user.
# sh upgrade.sh
-
The contents of the software license agreement are displayed.
Scroll the Screen and check the full contents of the license agreement.
-
If you agree the contents of the license agreement, enter yes otherwise enter no.
Do you agree the license terms (yes/no): yes
If you enter "yes",, the upgrade will be started. If you enter "no", it will be stopped.
-
Services are stopped.
Stopping services... succeeded.
-
Packages are upgraded.
Upgrading packages...
Preparing...                ########################################### [100%]
   1:maildepot3-libtextconv ########################################### [ 33%]
   2:maildepot3-mdadmin     ########################################### [ 67%]
   3:maildepot3-mdimport    ########################################### [100%]
The upgraded packages will differ depending on the differences between the original version and the new version. Only the packages which is need to be upgraded will be displayed on the Screen.
-
Start services.
Services are started automatically.
Starting services... succeeded.
-
Complete the upgrade of MailDepot.
Upgradation completed successfully.
Migration from older version
MailDepot version 3.x has lost the compatibility about archive storage format for MailDepot Version 1.x / 2.x. Therefore, you have to migrate archived mail data from MailDepot version 1.x / 2.x to MailDepot version 3.x. You will also have to migrate archived mail data from existing MailDepot 3.x when moving exising MailDepot 3.x to another new machine.
To migrate archived mail data from existing MailDepot 1.x / 2.x / 3.xto MailDepot version 3.x, you must install MailDepot version 3.x on another new machine without uninstalling existing MailDepot 1.x / 2.x / 3.x.
After installing new MailDepot version 3.x, migrate archived mail data as follows.Copy md_authenticity.conf
Copy the configuration file named md_authenticity.conf from MailDepot 1.x/2.x/3.x to MailDepot 3.x. You shoud perform this task before starting importing new mail on MailDepot 3.x.
| Source |
|
|---|---|
| Destination |
|
The md_authenticity.conf file holds the important information which is used for non-falsification checking feature. So, non-falsification checking will be allways failed if you forget to copy md_authenticity.conf file.
Create backup files
You need to create backup files to migrate on your existing MailDepot 1.x/2.x/3.x.
To create backup files for past month, please execute backup oeration on the "Backup" screen in the MailDepot administration console. After you execute the backup, a backup file (maildepot_YYYY_MM.tar.gz) will be created in the following directory.
- MailDepot 1.x
/opt/maildepot3/backups
- MailDepot 2.x
/opt/maildepot3/domain/DOMAIN/backups
- MailDepot 3.x
/opt/maildepot3/domain/DOMAIN/backups
To create backup file for this month, you need to run the backup function of md_backup_day command. You need to create daily backup files for the number of days in the current month.
% md_backup_day DOMAIN backup -o maildepot_YYYY_MM_DD.tar.gz YYYYMMDD
Copy backup files
You need to copy the backup files created on existing MailDepot 1.x/2.x/3.x to new MailDepot 3.x.
| Source |
|
|---|---|
| Destination |
|
You also need to copy backup files created with md_backup_day command.
Restore backup files
You need to execute restore operations for copied backup files on new MailDepot 3.x.
The list of copied backup files is displayed at "List of Backup Data" on MailDepot Administration Console for MailDepot 3.x.
After selecting the data to restore from the list, please click "Execute" button to start the restoration process.
After the restoration process is completed, the state of mail data will become Offline (unsearchable). If you wish to make it online (seachable), select the target data at "Backup" screen, then execute "Change Selected Data to Online".
For the backup files created by md_backup_day command on MailDepot 1.x/2.x/3.x, you need to restore copied backup files by using restore function of md_backup_day command on new MailDepot 3.x.
% md_backup_day DOMAIN restore maildepot_YYYY_MM_DD.tar.gz
When restoring with the md_backup_day command, if the -f option is not specified, the restore will not proceed if data for the target date already exists. If data already exists for the target date by import process, perform the restore using the -f option.
% md_backup_day DOMAIN restore -f maildepot_YYYY_MM_DD.tar.gz
Uninstallation Guide
To uninstall MailDepot, mount the Installation CD into the server and follow the procedure given below in the directory where the Installation CD is mounted.
-
Invoke uninstallation script "uninstall.sh" as root user.
# sh uninstall.sh
-
Stop services.
Services are stopped automatically.
Stopping services... succeeded.
-
Uninstall packages.
Uninstalling packages... succeeded.
-
Complete the uninstallation MailDepot.
Uninstallation completed successfully.
Even if uninstallation has been completed, files created after installation (Database clusters in which the mail messages are stored, all kinds of configuration files, log files, etc. ) are not deleted. If you want to delete these files, delete all files below the /opt/maildepot3 directory.